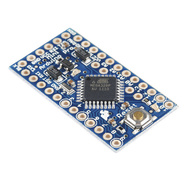
 Some time ago I purchased a dozen or more Arduino Pro Mini 328 3.3V 8Mhz boards, but only recently had a use for them. I was quite disappointed to find that 8 boards could not be programed through the Arduino IDE. Here’s how I rebuilt and reprogrammed the bootloader and fixed the problem using an STK500 and Ubuntu Linux.
Software Setup
You’ll need a working Arduino build environment and a tool like avrdude that can communicate with your ISP programmer:
sudo apt-get install make git
sudo apt-get install gcc-avr avr-libc avrdude
sudo apt-get install arduino
Then, get the latest Arduino source from GitHub:
git clone https://github.com/arduino/Arduino.git
Hardware Setup
To program the bootloader, you’ll need:
- An Arduino Pro Mini 328.
- An In-System-Programmer (ISP). I use an STK500 development board, but it is possible to use other ISPs, or another Arduino.
- A means of connecting the ISP 6-pin header from your programmer to individual pins on the Pro-Mini. Jumpers like this, or this work well.
- The correct parameters for communicating with your ISP. In my case, I use the default baud rate, the stk500v2 protocol, and /dev/ttyS0.
Connect the ISP 6-pin header from your programmer to the Pro-Mini like so:
 In the schematic above, note the numbers inside the ARDUINO_MINI symbol correspond to the Arduino pin-numbering scheme that matches the labels printed on the Pro-Mini board.
Test the setup to make sure everything is working by reading the fuses (adjust port and protocol as required for your ISP):
$ avrdude -P /dev/ttyS0 -c stk500v2 -p m328p

avrdude: AVR device initialized and ready to accept instructions
Reading | ################################################## | 100% 0.01s
avrdude: Device signature = 0x1e950f
avrdude: safemode: Fuses OK
avrdude done.  Thank you.
Selecting a Bootloader
There are 8 different types of bootloaders in use across various Arduino boards. A definition for each Arduino board type, including baud rates, programming protocols, and bootloaders, is found in ./hardware/arduino/boards.txt. When you select a board from the Tools menu of the Arduino IDE, the properties for that board are loaded from boards.txt.
If you aren’t sure which bootloader your Arduino uses, search through boards.txt and locate the corresponding “bootloader.file” in the sources. Here’s the entry for the Arduino Pro Mini 3.3V:
pro328.name=Arduino Pro or Pro Mini (3.3V, 8 MHz) w/ ATmega328

pro328.upload.protocol=arduino
pro328.upload.maximum_size=30720
pro328.upload.speed=57600

pro328.bootloader.low_fuses=0xFF
pro328.bootloader.high_fuses=0xDA
pro328.bootloader.extended_fuses=0x05
pro328.bootloader.path=atmega
pro328.bootloader.file=ATmegaBOOT_168_atmega328_pro_8MHz.hex
pro328.bootloader.unlock_bits=0x3F
pro328.bootloader.lock_bits=0x0F

pro328.build.mcu=atmega328p
pro328.build.f_cpu=8000000L
pro328.build.core=arduino
pro328.build.variant=standard
From boards.txt, we see the 3.3V Pro Mini uses the ATmegaBOOT_168_atmega328_pro_8MHz.hex bootloader and the 5V version uses the ATmegaBOOT_168_atmega328.hex bootloader. These files can be found in ./hardware/arduino/bootloaders/atmega.
Optiboot
I have read that it is possible to use the alternative Optiboot loader, with mixed success. If using this loader, you must set the board to “Arduino UNO” in the IDE, instead of “Arduino Pro Mini 3.3V”, or customize boards.txt. To quickly tell which loader is installed on a Pro Mini, count the number of green LED flashes after a reset: the standard bootloader flashes once, and the Optiboot loader flashes 3 times. I prefer to use the standard bootloader on all my Pro Mini devices to avoid confusion, but if you want to use the Optiboot loader, please see the procedure for burning a bootloader to an Arduino UNO.
Building and Burning the Bootloader
Apply the following patch to the source in ./hardware/arduino/bootloaders/atmega. This tells the compiler to use the EEPE register instead of EEWE, optimize for size, and tweak the Makefile to use the STK500 on the correct serial port.
This next step is optional, since the Git source already includes a pre-built binary, but it you want to build it yourself:
make clean
make atmega328_pro8  #3.3V, 8Mhz version
make atmega328       #5V, 16Mhz version
Finally, burn the bootloader to the board using the ISP configured in the Makefile:
make atmega328_pro8_isp  #3.3V, 8Mhz version
make atmega328_isp       #5V, 16Mhz version
If the bootloader has been successfully updated, the green LED will flash on and off until a sketch is uploaded. Open the Arduino IDE, set the board to “Arduino Pro or Pro Mini (3.3V, 8Mhz) w/ ATmega328” (or the 5V version), and attempt to upload a sketch.
Conclusion
In the case of my ‘broken’ Pro-Minis, something must have gone wrong at the factory when the initial bootloader was programmed onto these boards. I think I recall a post somewhere in a Sparkfun forum that mentioned a bad batch. Anyway, here’s what I saw before updating the bootloader:
And after:


